Showing posts with label Art Quilts. Show all posts

Kandinsky Revisited: Inspiration for a new art quilt


When I was an art student, I became fascinated by the art of Wassily Kandinsky. I loved his playfulness with shapes and colour. I also saw that his style would translate very well into quilt applique and created this art quilt below.

Kandinsky inspired art quilt mystic bird
Mystic Bird Art Quilt by Monica Curry 
Untitled (Kandinsky Inspired) by Monica Curry

I've recently been wanting to try something different, so I thought I'd revisit my Kandinsky phase; I'm glad I did. Recently, I found other quilts inspired by Kandinsky and discovered Kandinsky quilts are quite a thing in the quilting world.

Below are a few examples of the Kandinsky quilts I found recently. You can see that Kandinsky's art translates extremely well into art quilts. If you want some inspiration for your own Kandinsky quilt, check out wassily kandinsky.net where you'll find a catalogue of Kandinsky's artwork.


Patricia Bravo - My Vision of Kandinsky

The Vision of Kandinsky quilt pattern is one of three patterns by quilter and fabric designer Patricia Bravo. Update: July 07, 2021. The Kandinsky patterns by Patricia Bravo are no longer available.

Lolly Quilts

Check out these gorgeous Kandinsky quilts at the Lollyquiltzs Kandinsky Challenge.

lollyquiltz kandinsky quilt challenge

Carol J. Floyd - Kandinsky and Me

Kandinsky and Me. This is an award winning Kandinsky quilt from the 2010 American Quilt Society Quilt Show & Contest in Des Moines, Iowa.

kandinsky inspired quilt by carol j. floyd

Don't Call Me Becky

Inspired by the Kandinsky classic, Color Study, Squares with Concentric Circles. This quilt was created by Rebekah at Don't Call Me Becky.

Kandinsky Goes to the Bahamas by Daniela Schupp for the Art Quilt Association Inspired by the Masters Show

Spirit Dancers Art Quilt

This is my art quilt Spirit Dancers. I created this piece for a local art show called Stone Age. It was the first art show I'd been in, so I was pretty excited. I think my piece was the only fabric art in the show.


I sold the piece quickly and then received a call from the gallery curator. Someone from Australia also wanted one before they flew back home. I then had to rush around to make a duplicate. I was lucky to still have some of the hand-dyed fabric I used.

Monica at the Stone Age art show with her fabric art Spirit Dancers 

How To Make Fabric Foundations for Fabric Art


Are you looking for ways to use up small fabric scraps that are too small for anything? I discovered a fun way to do this by making what I call scrap sandwiches. It's not a new concept, but I couldn't find any good tutorials for it, so I decided to make my own instructions. I’ll sometimes spend an afternoon making these. It’s a fun and mindless project that produces interesting and beautiful textures and colour combinations that can be incorporated into your art quilts or mixed media projects. I’ve used them for quilt art postcards, makeup bags, and book covers. 

Fabric sandwiches were incorporated into my art quilt Mother Ship that's on the Fall 2012 Quilting Arts Magazine cover in Fall 2012.


Sister Moon by Monica Curry - Fabric Collage
Sister Moon by Monica Curry

Knowledge by Monica Curry - Fabric Collage
Knowledge by Monica Curry

Salmon Run by Monica Curry - Fabric Collage
Salmon Run by Monica Curry

Untitled by Monica Curry - Fabric Collage
Untitled by Monica Curry

INSTRUCTIONS


YOU WILL NEED
  • Fabric scraps.
  • Lightweight muslin or any lightweight non-stretchy fabric cut to 9 x 12 inches.
  • One piece of tulle cut to 11 x 14 inches.
  • Thread
  • Pins
  • Sewing machine
While working on a project, I throw my fabric scraps in a box I have under my work table. After I have a big enough stash of scraps, I sort everything according to colour and store them in plastic bags.

fabric scraps for mixed media art


1.  FOUNDATION LAYER
Start your sandwich with a lightweight, non-stretchy, foundation piece approximately 9 inches by 12 inches. This is the easiest size to work with. I use a light, inexpensive muslin for the foundation, but anything lightweight and non-stretchy will work. You can also use a coloured foundation that works with the scrap colours.

mixed media fabric art 1

2.  MIDDLE LAYER
Pick the colours you want to work with. You can use monochromatic colours, contrasting colours, or grab a bunch of random colours. Start placing your fabric scraps down on the foundation until you've covered it as much as you can.

mixed media fabric art 2

mixed media fabric art 3

3.  TOP LAYER
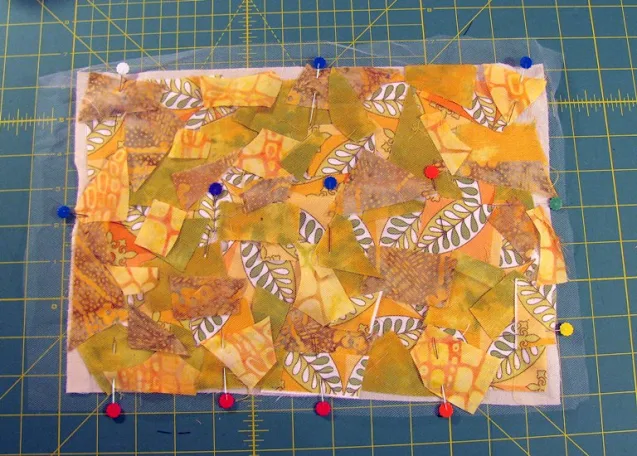
After all the scraps are put down on your foundation layer, cover these two layers with a piece of tulle about two inches wider than your foundation piece (11" x 14") giving you an overhang of 1 inch all the way around. Pin these three layers down around the edges and in the middle.

mixed media fabric art 4

4.  STITCH AROUND OUTER EDGE
Once the three layers are pinned securely, stitch around the edge of the sandwich with a basting stitch creating a seam width of about 1/2 inch.

mixed media fabric art sewing

mixed media fabric art sewing detail

5.  QUILT
After you’ve sewn around the edge, sew a line across the length and the width of the sandwich. Then stitch a grid at least 3" in width. Your grid can be as small as you like, but don’t go wider than 3" because your scraps could start to shift around too much during the next step.

mixed media fabric art finished

6.  When you’ve completed stitching your grid, you now get a chance to use some of those decorative stitches you have on your sewing machine. If you’re like me, you may not use them very often. Pick a decorative stitch and, starting at one edge of the sandwich, sew to the other edge. There is no hard and fast rule about this. Just pick out a bunch of nice stitches to use and sew along the sandwich randomly. I experimented with my alphabet stitch for this project and really liked the outcome. You can also use free-motion stitching which can produce some beautiful results.

mixed media fabric art details

7.  When all your stitching is complete, trim the excess tulle along the outer seam line to clean up the edges. I do this because I find the excess tulle snags on things when you work with the sandwich later.

8.  Turn the sandwich over face down and press on the wrong side so you don’t gum up your iron with melted tulle. You can see in this photo the grid width and where I’ve sewn the decorative stitches randomly across the sandwich.


TIPS

  • Sprinkle thread, ribbon, yarn, or lace scraps on top of the fabric layer before adding the tulle layer.
  • Try using a foundation piece made from used dryer sheets that have been stitched together.
  • Print images or lettering on fabric that can be incorporated into the scrap layer.
  • If the piece isn’t going to be washed, add bits of pretty paper or newsprint to the scrap layer.
  • Use a foundation piece colour to coordinate with the scraps.
  • Experiment and have fun!

    Picasso inspired art quilts

    "The Psychic" Art Quilt by Monica Curry
    The Psychic by Monica Curry


    The Dream Diary Art Quilt by Monica Curry
    The Dream Diary by Monica Curry