Showing posts with label Scrap Quilting. Show all posts

Make Super Easy Checkerboard Blocks - SCRAP BUSTER!

make super easy checkerboard blocks


INSTRUCTIONS

I discovered this technique for making scrap checkerboard blocks several years ago. I used it to make my grand-niece a doll quilt (above). With these few easy steps, the results are so worth it. When you're finished, every square will be aligned perfectly and you'll have a strong base to join the blocks so they won't stretch out of shape.

Finished Block: 12"x 12" (30 cm x 30 cm))

1.  First, you'll need a non-woven, lightweight, single-sided fusible interfacing. I purchased this very inexpensive one on Amazon.


2.  Cut [18] 2½-inch (6 cm) colour squares and [18] 2½-inch (6 cm) light colour squares.

3.  Cut [1] 13" x 13" (31 cm x 31 cm) square of interfacing.

4.  Place squares 1/2" from the edges on the adhesive side of the interfacing. Butt together the squares as shown below alternating between light and dark colours.


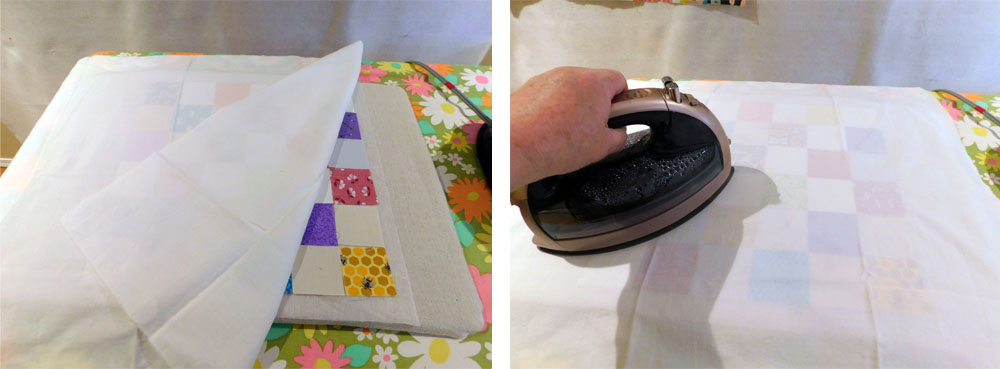
5.  Place a piece of cotton over the squares and press to adhere them to the fusible web.


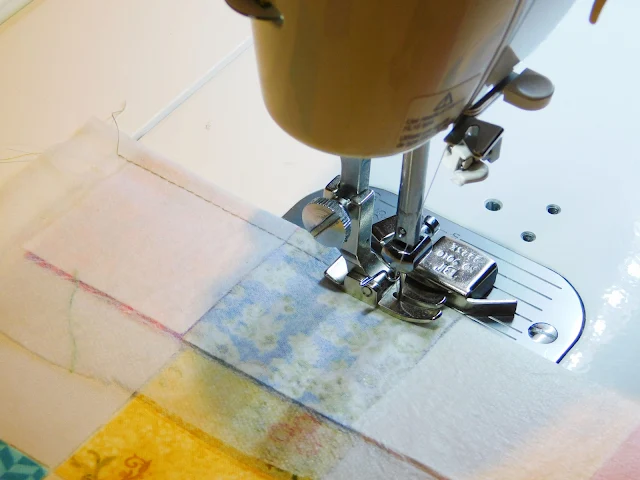
6. Fold the first row right sides facing and sew a  "fat" 1/4" seam allowance. Repeat this until all the rows are stitched.


7.  Your first set of rows will look like this.


8.  Trim a about 1/8" off the edge of each seam row and press seam open. Be very careful to not cut the stitches!


9.  Stitch the horizontal rows and trim the seams the same as you did with the vertical rows.


10.  Press down all your seams. This is what your stitched squares will look like from behind.


11.  Press block and square up if necessary. You can see how precisely the squares are lined up.


If you need help organizing your scraps before you start, go to my scrap sorting tutorials below:

How To Cut Scraps for 9-Patch Quilt Blocks

How To Cut Scraps for 9-Patch Quilt Blocks

Print Friendly and PDF

A year ago, I posted a tutorial for sorting fabric scraps. I decided to supplement that post with a quick tutorial for cutting fabric scrap squares for 9-patch blocks. Because of their versatility, 9-patch blocks are great for making scrap quilts. The easiest square size to start with is 5 inches should you have a lot of Charm Pack and Layer Cake scraps.

SQUARE SIZES


The easiest square size to start with is 5" should you have a lot of Charm Pack and Layer Cake scraps.
  • 5 inch - Finished Size: 4½ inch   (12.5 cm - Finished Size: 6.25 cm )
  • 2¾ inch - Finished Size: 2¼ inch   (7 cm - Finished Size: 3.5 cm)
  • 2 inch - Finished Size: 1½ inch   (5 cm - Finished Size: 2.5 cm)

YOU WILL NEED

  • A good assortment of quilt cotton fabric scraps
  • Iron and ironing board
  • Rotary cutter (have fresh blades available)
  • 6" x 12" and/or 8" x 8" quilt ruler

INSTRUCTIONS


1. Separate your scraps into individual colours: yellow, orange, purple, red, etc. This is a very important step. You don't want to have to sort little 2-inch squares by colour, trust me!

2. Sort scraps by size. 


3. Press all the scraps before cutting. A quick way to do this is to layer about 4 to 6 pieces and steam press.


4. Before cutting squares, stack several pieces and line up the top right corner.


5. Line up your ruler about 1/4" away from the top right corner of the fabrics and trim.


6. Rotate the fresh-cut corner to the lower left. Line up your square size at the corner and trim. If some of the offcuts are large enough, cut squares from these as well.


STORING YOUR SQUARES

Store your squares neatly according to colour. Over time you'll accumulate a lot of squares, so finding the right box for them is a good idea. I normally use plastic bins from the dollar store. The container below is a cookie tray from Costco. Use whatever works.


Feather Your Nest Table Runner

I had a great summer! I finished up some UFOs and I have some beautiful new patterns to launch in the next few months. I'm sure you'll love them as much as I do.

My new pattern launch for this month is my Feather Your Nest table runner pattern. I had been seeing the feather block all over the internet and had to make my own pattern for it. My method for making the feathers is simple. My instructions are thorough and easy to follow, so don't be afraid to jump right in and give it a try. This pattern is great for using up your scraps. The finished table runner is 38" x 14". The pattern also includes instructions for making a single 12" x 12" block shown below.


Festher Your Nest table runner pattern

Improv Quilting: The modern scrap quilt

One of my favourite piecing techniques is Improv. I come from a fine arts and design background so I love to go off the beaten path. I enjoy the freedom Improv provides. I believe it's quilting for the soul. There are no real rules for Improv quilting. You are basically piecing scraps together in a free-form way. The results are stunning. The textures and all the combined colours can result in a true work of art.

My piece Summer Aspen below was submitted for a new wing at a local hospital. The theme for the submissions was trees. I chose the Aspen tree because I love how Aspen leaves rustle in the wind. Unfortunately, the piece wasn't chosen but I ended up with a very nice quilt for my home.


Improv quilt Summer Aspen by Monica Curry
SUMMER ASPEN by Monica Curry

The strips I used for the tree trunks in Summer Aspen were cut from fabric that was printed from a linocut I made. I wanted each strip to look like an actual Aspen tree.


I liked how this quilt turned out and it hung in my office for a couple of years. I now enjoy it as a sewing machine cover.


My art quilt Closing Time below was shown at the Manitoba Crafts Council Exhibition 2013. The quilt was named after Leonard Cohen's song Closing Time. While I was making the quilt this line from the song kept coming up in my head, "and the men they dance on the polka-dots" because of the polka dot fabric I was using.

CLOSING TIME by Monica Curry


CLOSING TIME (Detail) Photo by L. Norman


Improv Quilting Books

Several years ago I bought Rayna Gillman's book Create Your Own Free-Form Quilts: A Stress-Free Journey to Original Design. I wanted to try something new and push the envelope a little. I also had a ton of little scraps I couldn't bear to throw out. The result was my improv quilt called Summer Aspen (shown above). I really enjoyed making this quilt. Gillman's book is very comprehensive and well written. She provides very good step-by-step directions for her "free-form" quilting technique.


In 2017, Rayna published her new book Create Your Own Improv Quilt: Modern quilting with no rules and no rulers. I haven't bought it yet but from what I can tell her style has changed from her first book.


See more great examples of Improv quilts at my Pinterest board.


Tips for Sorting Your Fabric Scraps

Tips for Sorting Your Fabric Scraps

Print Friendly and PDF

Well, another new year has begun. All the Christmas decorations are put away, the turkey leftovers are eaten, and life has fallen back into a regular routine. This is the time of year that I like to tidy my studio and get it ready for the days ahead. It's also the perfect time to purge some of my scrap fabrics and get them ready for scrap quilts.

When I first started sorting scraps, I wasn't quite sure what to do with them. I now follow a few simple rules I learned along the way.

1. Have a scrap basket handy to throw unused cut-offs. I keep mine under my cutting table..


2. I consider anything smaller than a Fat Quarter (18" x 22") a scrap.

3. Cut scraps in various sized squares. I cut an assortment of squares for nine-patch blocks in the following sizes: 5", 2¾",  and 2".  See my post on how to do this How To Cut Scraps for 9-Patch Quilt Blocks 

4. You'll be amazed at how fast your square supply grows. Keep your squares in a storage container.

quilt scraps in container

5. Keep leftover fabric strips to use for string quilts. I this container from the dollar store.


Download the FREE PDF pattern CHECKER BOARD SCRAPPY MINI QUILT PATTERN

Free Checkerboard Mini Quilt Pattern

HERE ARE SOME EXCELLENT SOURCES THAT HELPED ME GET MY SCRAPS ORGANIZED

Postage stamp doll quilt

I love postage stamp quilts; they're great stash busters. I made this doll quilt for my grandniece, Abby, who just had a new baby brother. I made her mom my Precious Bundle pinwheel quilt for the new arrival, and my sister and I thought it would be nice to make a quilt for Abby's baby doll as well.

To make this quilt, I used a great piecing technique I found at So Resourceful This technique makes piecing all those little squares a breeze. See the tutorial HERE

postage stamp doll quilt

postage stamp doll quilt - detail 1


postage stamp doll quilt - detail 2

Quilted doggy desk mat for my fluffy butt

My little Pomeranian Sophie is my shadow. She's with me everywhere I go around the house, but I've been spending a lot more time at my computer lately. Initially, she wanted to sit on my lap while I worked (she's a lap dog, after all), but I wouldn't get anything done that way. So, I plunked her on the desk. Now she sleeps there while I'm working, so I decided to make her a small quilted mat for the desktop.


doggy desk mat


Awhile back, I picked up some cute fabric from with foxes on it. The fabric line is Good Natured by Riley Blake. My husband always says Sophie reminds him of a fox, so I made her a quilted "desk mat" with it. This mat would be great for your feline friend as well. I noticed the new mat was a bit slippy at first, so I put a piece of anti-slip mesh under it and that worked great.

Sophie on her new mat

Good Natured by Riley Blake


I think the little foxes in the birch trees are adorable.

Good Natured by Riley Blake - detail


Sophie fast asleep on her new blankie.

Sophie asleep on my desk